springboot也用了很久了,用的时候只知道他很好用,不需要再额外的配置乱七八糟的东西,那么到底是怎么做到的呢?
以前我只会回答:SpringBoot中已经帮助我们配置了.
现在回过来看看这个问题, 配置千奇百怪,SpringBoot是怎么满足所有人的需求呢?
Servlet3.x
在开始SpringBoot之前,要先引入Servlet3.x
JavaWeb中怎么导入三大组件呢?
- web.xml
- @WebServlet/@WebFilter/@WebListener
- SPI机制
SPI机制
SPI即Service Provider Interface.
在之前,如果有两个发送短信的供应商,阿里和腾讯.分别要实现两个服务商的接口调用
public interface SmsService {
    void sendSms(String mobile, String message);
}

public class AliSmsService implements SmsService {
    @Override
    public void sendSms(String mobile, String message) {
        System.out.println("ali send message");
    }
}

public class TencentSmsService implements SmsService {
    @Override
    public void sendSms(String mobile, String message) {
        System.out.println("tencent send message");
    }
}
在使用的时候呢?想要用哪个就要将哪个服务实例化.
public class MainClass {
    public static void main(String[] args) {
        SmsService smsService = new AliSmsService();
        smsService.sendSms("13111111111", "message content");
    }
}
这样执行输出结果就是AliSmsService中的结果.
ali send message那产品提需求了,我不想要让阿里的服务商发送,他们的短信到达率没有腾讯高.
这种实现就只能去修改代码,将AliSmsService修改为TencentSmsService.
而使用SPI机制, 只需要在项目的META-INF/services中添加一个文件.
这个文件的文件名为借口的全类名,内容为实现了这个接口的实现类.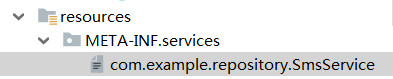
// 文件名: com.example.repository.SmsService
// 文件内容:
com.example.repository.AliSmsService


public class MainClass {
    public static void main(String[] args) {
        ServiceLoader<SmsService> smsServices = ServiceLoader.load(SmsService.class);
        Iterator<SmsService> iterator = smsServices.iterator();
        while (iterator.hasNext()){
            iterator.next().sendSms("13111111111", "message content");
        }
    }
}
输出结果
ali send message如果想要将AliService改为TencentService, 只需要将内容改为
com.example.repository.TencentSmsService

// 输出
tencent send message
看起来很复杂,不要紧重点不在这里.
结合之前在SpringBoot(一)中提到的@Import注解.
SpringBoot做了什么
- 内置Tomcat
- 启动时自动配置
内置Tomcat
记得以前使用spring框架的时候,启动时需要选择一下tomcat容器,整个项目也没有一个启动类.
在使用SpringBoot之后,有了一个主启动类,也不需要再选择tomcat了.
但是项目运行的时候,又会打出tomcat已经开始运行的log
[main] Tomcat initialized with port(s): 8080 (http)
[main] Starting service [Tomcat]
[main] Starting Servlet engine: [Apache Tomcat/9.0.29]
[main] Initializing Spring embedded WebApplicationContext
[main] Root WebApplicationContext: initialization completed in 959 ms
[main] Initializing ExecutorService 'applicationTaskExecutor'
[main] Tomcat started on port(s): 8080 (http) with context path ''
因此我们去找一下tomcat藏在哪里.
@SpringBootApplication
public class DemoApplication {

    public static void main(String[] args) {
        // 进入run()
        SpringApplication.run(DemoApplication.class, args);
    }
}

    // 索引到SpringApplication.run(String... args)方法中
    public ConfigurableApplicationContext run(String... args) {
        ...
        try {
            ...
            // 定位到该方法处.
            refreshContext(context);
            ...
        }
        catch (Throwable ex) {
            ...
        }
        ...
        return context;
    }

    private void refreshContext(ConfigurableApplicationContext context) {
        refresh(context);
        ...
    }

    protected void refresh(ApplicationContext applicationContext) {
        Assert.isInstanceOf(AbstractApplicationContext.class, applicationContext);
        // 进入refresh方法
        ((AbstractApplicationContext) applicationContext).refresh();
    }


    @Override
    public void refresh() throws BeansException, IllegalStateException {
        synchronized (this.startupShutdownMonitor) {
            ...
            try {
                ...
                // 进入该方法
                // Initialize other special beans in specific context subclasses.
                onRefresh();
                ...
            }
            catch (BeansException ex) {
                ...
            }finally {
                ...
            }
        }
    }

    // 找到onRefresh()方法, 他的默认实现是不做任何事.
    // 找到他的子类ServletWebServerApplicationContext中的实现
    protected void onRefresh() throws BeansException {
        // For subclasses: do nothing by default.
    }


    @Override
    protected void onRefresh() {
        super.onRefresh();
        try {
            // 进入该方法
            createWebServer();
        }
        catch (Throwable ex) {
            throw new ApplicationContextException("Unable to start web server", ex);
        }
    }

    private void createWebServer() {
        ...
        if (webServer == null && servletContext == null) {
            // 创建tomcat工厂
            ServletWebServerFactory factory = getWebServerFactory();
            // 创建tomcat
            // 进入 getWebServer()
            this.webServer = factory.getWebServer(getSelfInitializer());
        }
        else if (servletContext != null) {
            ...
        }
        ...
    }

    // ServletWebServerFactory接口中的方法
    // 找到他的子类TomcatServletWebServerFactory
    WebServer getWebServer(ServletContextInitializer... initializers);

    // TomcatServletWebServerFactory中创建tomcat的方法
    @Override
    public WebServer getWebServer(ServletContextInitializer... initializers) {
        ...
        // 创建了tomcat
        Tomcat tomcat = new Tomcat();

        // 对tomcat做一些设置 ex. setPort()
        ...

        // 进入该方法
        return getTomcatWebServer(tomcat);
    }

    protected TomcatWebServer getTomcatWebServer(Tomcat tomcat) {
        // 进入TomcatWebServer的构造器
        return new TomcatWebServer(tomcat, getPort() >= 0);
    }


    public TomcatWebServer(Tomcat tomcat, boolean autoStart) {
        Assert.notNull(tomcat, "Tomcat Server must not be null");
        this.tomcat = tomcat;
        this.autoStart = autoStart;
        // 进入该方法
        initialize();
    }

    private void initialize() throws WebServerException {
        synchronized (this.monitor) {
            try {
                ...
                // Start the server to trigger initialization listeners
                // 启动tomcat
                this.tomcat.start();
                ...
            }
            catch (Exception ex) {
                ...
            }
        }
    }
因此,SpringBoot不需要再放到tomcat中是因为他内部已经帮助我们启动好了tomcat
因此只要把整个项目达成jar包, 用java -jar xxx.jar 就可以启动了.
接下来找找tomcat放在那里了.
<!--在项目下的pom.xml中内容-->
<dependency>
    <groupId>org.springframework.boot</groupId>
    <!--进入-->
    <artifactId>spring-boot-starter</artifactId>
</dependency>


<!--spring-boot-starter-2.2.2.RELEASE.pom 中内容-->
<dependency>
  <groupId>org.springframework.boot</groupId>
    <!--进入-->
  <artifactId>spring-boot-autoconfigure</artifactId>
  <version>2.2.2.RELEASE</version>
  <scope>compile</scope>
</dependency>


<!--spring-boot-autoconfigure-2.2.2.RELEASE.pom 中内容-->
<dependency>
  <groupId>org.apache.tomcat.embed</groupId>
    <!--内置tomcat-->
  <artifactId>tomcat-embed-core</artifactId>
  <version>9.0.29</version>
  <scope>compile</scope>
  <optional>true</optional>
</dependency>
自动配置
这部分要从@SpringBootApplication注解开始讲起, 这个注解很眼熟啊. SpringBoot的启动类上都会写,他内部都有什么呢?
主要有三部分
@SpringBootConfiguration
@ComponentScan
@EnableAutoConfiguration
@SpringBootConfiguration
@SpringBootConfiguration有啥作用呢?
@Target(ElementType.TYPE)
@Retention(RetentionPolicy.RUNTIME)
@Documented
@Configuration
public @interface SpringBootConfiguration {
  @AliasFor(annotation = Configuration.class)
  boolean proxyBeanMethods() default true;
}
好像没看到什么有用的东西, 实际他就是一个@Configuration, 这么标注意味着在主启动类中也可以配置bean
@SpringBootApplication
public class DemoApplication {

  public static void main(String[] args) {
      SpringApplication.run(DemoApplication.class, args);
  }

  // 意味着这样写这个@Bean是生效的.
  @Bean
  public User user(){
      return new User();
  }
}
但是因为这些东西可以写在其他配置文件中,为了避免污染启动类,所以一般不这么写.
@ComponentScan
这个注解是配置包扫描的范围, 这个范围是主启动类所在的包及其子包.
比如我当前主启动类是在com.example.demo下,那么就只会扫描com.example.demo*的包.
如果有其他的类放在如com.example.foo下面,就不会进行扫描
会扫描范围内所有被@Repository,@Service,@Controller,@Component注解修饰的类.
@EnableAutoConfiguration
在这个注解中, 有一个@Import(AutoConfigurationImportSelector.class).
这是之前提到的@Import的一种用法,导入一个ImportSelector,
    @Override
    public String[] selectImports(AnnotationMetadata annotationMetadata) {
        if (!isEnabled(annotationMetadata)) {
            return NO_IMPORTS;
        }
        AutoConfigurationMetadata autoConfigurationMetadata = AutoConfigurationMetadataLoader
                .loadMetadata(this.beanClassLoader);
        // 进入该方法
        AutoConfigurationEntry autoConfigurationEntry = getAutoConfigurationEntry(autoConfigurationMetadata,
                annotationMetadata);
        // 得到的返回值 就是所有使用到的,需要自动配置的类的全类名.
        // 再由ImportSelector的使用,由全类名开始实例化.
        return StringUtils.toStringArray(autoConfigurationEntry.getConfigurations());
    }

    protected AutoConfigurationEntry getAutoConfigurationEntry(AutoConfigurationMetadata autoConfigurationMetadata,
            AnnotationMetadata annotationMetadata) {
        if (!isEnabled(annotationMetadata)) {
            return EMPTY_ENTRY;
        }
        AnnotationAttributes attributes = getAttributes(annotationMetadata);
        // 进入该方法
        List<String> configurations = getCandidateConfigurations(annotationMetadata, attributes);
        // 在读取完全部配置之后,将重复的去除.
        configurations = removeDuplicates(configurations);
        // 去除@ComponentScan中 exclude 中指定的值
        Set<String> exclusions = getExclusions(annotationMetadata, attributes);
        checkExcludedClasses(configurations, exclusions);
        configurations.removeAll(exclusions);
        configurations = filter(configurations, autoConfigurationMetadata);
        // 将没有导入jar包的类去除
        fireAutoConfigurationImportEvents(configurations, exclusions);
        return new AutoConfigurationEntry(configurations, exclusions);
    }

    protected List<String> getCandidateConfigurations(AnnotationMetadata metadata, AnnotationAttributes attributes) {
        // 此处传入的是@EnableAutoConfiguration的全类名
        List<String> configurations = SpringFactoriesLoader.loadFactoryNames(getSpringFactoriesLoaderFactoryClass(),
                getBeanClassLoader());
        Assert.notEmpty(configurations, "No auto configuration classes found in META-INF/spring.factories. If you "
                + "are using a custom packaging, make sure that file is correct.");
        return configurations;
    }

    //
    public static List<String> loadFactoryNames(Class<?> factoryType, @Nullable ClassLoader classLoader) {
        String factoryTypeName = factoryType.getName();
        // 进入该方法
        return loadSpringFactories(classLoader).getOrDefault(factoryTypeName, Collections.emptyList());
    }


    private static Map<String, List<String>> loadSpringFactories(@Nullable ClassLoader classLoader) {
        MultiValueMap<String, String> result = cache.get(classLoader);
        if (result != null) {
            return result;
        }

        try {
            // public static final String FACTORIES_RESOURCE_LOCATION = "META-INF/spring.factories";
            // 去读取META-INF/spring.factories中
            // org.springframework.boot.autoconfigure.EnableAutoConfiguration对应的value
            Enumeration<URL> urls = (classLoader != null ?
                    classLoader.getResources(FACTORIES_RESOURCE_LOCATION) :
                    ClassLoader.getSystemResources(FACTORIES_RESOURCE_LOCATION));
            result = new LinkedMultiValueMap<>();
            while (urls.hasMoreElements()) {
                URL url = urls.nextElement();
                UrlResource resource = new UrlResource(url);
                // 实际也是用properties的方式
                Properties properties = PropertiesLoaderUtils.loadProperties(resource);
                for (Map.Entry<?, ?> entry : properties.entrySet()) {
                    String factoryTypeName = ((String) entry.getKey()).trim();
                    for (String factoryImplementationName : StringUtils.commaDelimitedListToStringArray((String) entry.getValue())) {
                        result.add(factoryTypeName, factoryImplementationName.trim());
                    }
                }
            }
            cache.put(classLoader, result);
            return result;
        }
        catch (IOException ex) {
            throw new IllegalArgumentException("Unable to load factories from location [" +
                    FACTORIES_RESOURCE_LOCATION + "]", ex);
        }
    }
这样SpringBoot就把需要自动配置的类,以及哪些需要配置哪些不需要配置给加载好了.